
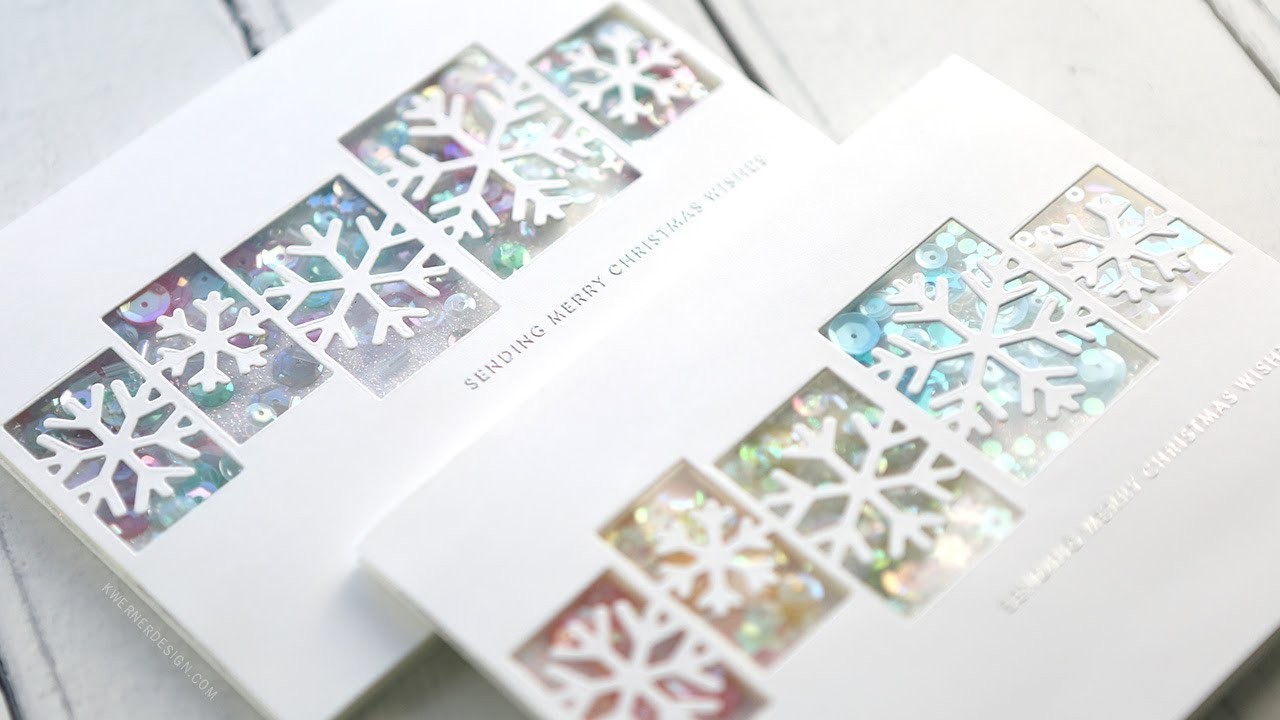
Welcome crafters to a crafty winter wonderland! Today I’m going to show you how to create a beautiful snowflake embossed shaker card with 12×12 cardstock. It’s an easy and fun craft project to do with the kids during the holidays.
Nothing says winter quite like snowflakes, and this snowflake embossed shaker card is the perfect way to add some wintry sparkle to your holiday season! This easy-to-make card is a great way to show your friends and family that you care this holiday season.
First, gather all the supplies you need. You’ll need some white cardstock, a snowflake embossing folder, a craft die-cutter, a shaker card kit, and some glitter and sequins. Once you have all your supplies, you’re ready to get started.
To start, you will need some cardstock, a ruler, a craft knife, a cutting mat, a pen, a stamp of your choice, a pair of scissors, double-sided tape, sequins, and a clear shaker dome.
Begin by cutting a piece of white cardstock to the size of the shaker card. Then place the cardstock into the snowflake embossing folder, and run it through your die-cutter. This will create a beautiful snowflake pattern on the cardstock.
Next, measure and cut a piece of cardstock to the desired size. With the ruler and craft knife, score a line down the centre of the cardstock. This will give the card a nice crease in the centre and make it easier to fold.
Next, cut a piece of acetate to the same size as the cardstock and place it on top of the cardstock. Then use the foam adhesive included in the shaker card kit to adhere the two pieces together.
Once the card has been cut and scored, use the pen to draw a snowflake on the card. Then use the craft knife to carefully cut out the snowflake shapes. Make sure to cut on the drawn lines and not outside of them, as this will give a cleaner look.
Now it’s time to add the glitter and sequins. Start by adding some of the glitter to the centre of the card, and then sprinkle some of the sequins around the edges. Make sure that the glitter and sequins are completely sealed inside the card!
Now it’s time to add the shaker elements. Place a piece of double-sided tape around the edge of the snowflake. Then pour your sequins onto the tape and press down to secure. Place the clear shaker dome over the sequins and press down to secure.
Finally, use the foam adhesive cardstock to adhere the card to the card base included in the shaker card kit. You now have a beautiful snowflake embossed shaker card.
Now it’s time to emboss the card. Use the stamp to add a pattern to the card. This will give the card a nice textured look. Once the embossing is done, fold the card along the scored line and secure the edges with double-sided tape.
This card is perfect for sending to friends and family during the holiday season. They’ll be sure to love it! So gather your supplies and get ready to create your own snowflake embossed shaker card. Happy crafting!
Your snowflake embossed shaker card is now complete and ready to be gifted to someone special this holiday season. This is a simple and easy card to make, so don’t be afraid to get creative and add your own unique touches. Enjoy!